Text feature selection for machine learning – part 1
We do a lot of projects that require extracting text features from documents, for use with recommendation systems, clustering and classification.
Often the “document” is an entity like a person, a company, or a web site. In these cases, the text for each document is the aggregation of all text associated with each entity – for example, it could be the text from all pages crawled for a given blog author, or all tweets by one Twitter user.
This seemingly trivial aspect of a big, sophisticated machine learning-based project is often the most important piece that you need to get right. The old adage of “garbage in, garbage out” is true in spades when generating features for machine learning. It doesn’t matter how cool your algorithm is, your results will stink if the features don’t provide good signals.
So I decided to write up some of the steps we go through when generating text-based features. I’m hoping you find it useful – please provide feedback if anything isn’t clear, or (gasp) isn’t correct.
Similarity
In order to constrain this writing project to something a bit less overwhelming, I’m going to focus on just one aspect of machine learning & text features, namely similarity. Often similarity between two entities is the “distance” between their feature vectors, which is a set of attributes and weights. The closer these two feature vectors are to each other, the greater the similarity between the two entities.
For example, if I’ve got two users, and the first user’s name is “Bob Krugler” and the second user’s name is “Krugler, Robert”, I could calculate a similarity between them based on equality (or lack thereof) between the names. The feature vector for each user consists of names and weights, such as [Bob:1, Krugler:1] and [Robert:1, Krugler:1]. I could get better results by doing things like synonym expansion, such that “Bob” is equal to “Robert”. Note that using this approach, I’d say that “Joe Bob” was somewhat similar to “Bob Krugler”, since they’ve got the name “Bob” in common, even though for “Joe Bob” this is (supposedly) a last name. Which actually might be a good thing, if you’re dealing with badly formatted input data.
Using text as features for calculating similarity between entities makes sense, and is a common approach for content-based recommendation engines. The other main approach for recommendations is collaborative filtering, where the user’s relationship with items (e.g. user activity) determines whether two users or items are similar (e.g. “how many books did user X and user Y both view?”).
Content-based similarity is especially useful when you don’t have much user activity data to derive similarity, or the lifespan of an item (or a user) is so short that there isn’t a lot of overlap in user-item activity, and thus it’s hard to find similar users based on shared preferences for items.
The power of content-based similarity is that once I have an effective way to create good features and meaningful weights, I’m in a good position to do clustering of users, recommend emails to read, recommend users to connect with, etc. And I can do all of this without any user-item preferences.
But picking the right set of text features to use for content-based similarity isn’t easy, and in this series of blog posts I’ll try to walk you through the typical sequence of steps, using as our example data set the emails posted by users to the Mahout mailing list. If we have good features, we should be able to calculate appropriate similarity scores (distances) between users.
The code and data used in my write-up can be found at http://github.com/ScaleUnlimited/text-similarity. As the code will be evolving while I write these blog posts, I’ll be creating tags named “part 1”, “part 2”, and so on.
One final note – I’m using Cascading to define the workflows that generate my features, Solr/Lucene to extract words from text, and Mahout to find similar users. But the actual systems used to generate features and calculate similarities matter less than the process of figuring out how to get good features out of the text.
Getting the data
The first step is always collecting the data we’re going to use in the analysis. I grabbed the archive page at http://mail-archives.apache.org/mod_mbox/mahout-user/, extracted all of the links to archive files (in the mbox format), and then downloaded all of the files.
After that I needed to generate data in a useful, easy-to-process format for downstream analysis. My target was one line per email, with tab-separated fields for msgId, author, email, subject, date, replyId and content. The Tika content analysis project has an RFC822 parser for parsing these mbox files, but it generates a single output for each file, without some of the fields that we need.
So I first had to write code to split mbox files on email boundaries, and then use a modified version of the Tika RFC822 parser to extract all of the required metadata. I also had to convert tabs and newlines in the text to \t and \n sequences, so as to avoid issues with Hadoop splitting up text files on line boundaries.
The code for this processing is in the com.scaleunlimited.emailparsing package.
The end result is a a file with lines that look like this (fields broken into separate lines):
msgId: <1326798618.75219.YahooMailNeo@web121201.mail.ne1.yahoo.com>
author: Harry Potter
email: harry456great@yahoo.com
subject: Re: MR Vectorization
date: 2012-01-17T11:10:18Z
replyId: <4F155317.1070703@gmail.com>
content: thanks sir...  that was really helpful..\n\n\n...
There are two versions of this data in the GitHub project, one with only 100 emails called mahout-emails.tsv, and the other with 5900 emails called mahout-emails-big.tsv.
Generating text features
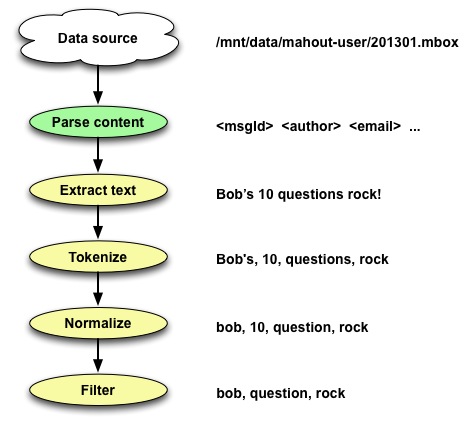
Now we come to the heart of the matter – what makes a good text feature for calculating similarity? There’s no single approach that works in all situations, but some common steps that you almost always need are:
- Extract the relevant text from the content.
- Tokenize this text into discrete words.
- Normalize these words (case-folding, stemming)
- Filter out “bad words”.
- Generate terms from multiple adjacent words.
- “Boost” terms based on structure.
- Aggregate terms for entities and generate term scores.
- Filter terms to reduce feature “noise”.
I’ll cover steps 1, 2, 3 & a bit of 4 in the remainder of this blog post, the rest of step 4 in part 2, and steps 5 through 8 in part 3. The portion of the overall workflow that we’re discussing here looks like…
Step 1 – Extracting relevant text
We’ve got two fields with interesting text – the subject, and the content.
For this step, we’re going to focus on just the content – we’ll talk about the subject field in step 6, in the context of boosting terms based on structure.
This step is trivial, primarily because the heavy lifting of parsing mail archives has already been done. So we have a field in our input text which has exactly the text we need. However we need to re-convert the text to contain real tabs and linefeeds, versus the escaped sequences, as otherwise that messes up the tokenization we’ll be doing in the next step (e.g. the sequence “\tTaste” would be tokenized as “tTaste”, not just “Taste”). There’s a ParseEmails function in the TextSimilarityWorkflow.java file which takes care of this step.
Initially I thought that I should also strip out quoted text from email, since that wasn’t text written by the email author, but it turns out that’s often very useful context. Many reply-to emails are mostly quoted text, with only small amounts of additional commentary. The fact that the email author is replying to an earlier email makes all of the text useful, though we might want to apply weighting (more on that in step 6).
Step 2 & 3 – Tokenizing & normalizing text
Now we’re into the somewhat arcane area of text analysis. Generally this is a series of transformations applied to a large “chunk” of text, which includes:
- Splitting the text into discrete tokens (tokenization).
- Simple normalization such as lower-casing and removing diacriticals.
- Stemming and other language-specific transformations.
Luckily Solr (via Lucene) has support for all of these actions. We could directly use Lucene, but building our analysis chain using Solr makes it easy to configure things using XML in the schema.xml file. For example, here’s a field type definition for English text:
    <fieldType name="text_en" class="solr.TextField">
      <analyzer>
        <tokenizer class="solr.StandardTokenizerFactory"/>
        <filter class="solr.ICUFoldingFilterFactory"/>
	    <filter class="solr.EnglishPossessiveFilterFactory"/>
        <filter class="solr.KeywordMarkerFilterFactory" protected="protwords_en.txt"/>
        <filter class="solr.PorterStemFilterFactory"/>
      </analyzer>
    </fieldType>
This says we’re going to do the initial splitting of text into tokens using the StandardTokenizer, then we’ll use the ICUFoldingFilter to make everything lower-case, remove diacriticals, etc. After that we’ll strip out possessives, then we’ll set up for Porter stemming by protecting words that shouldn’t be stemmed.
But how do we use Solr in a Cascading/Hadoop workflow? The SolrAnalyzer class has the grungy details, but basically we synthesize what looks like a Solr conf directory, using resources found inside of our jar (in src/main/resources/solrparser), and then we can instantiate a Lucene Analyzer based on our target field type (e.g. “text_en”).
So how well does this work? If we pass in “Bob’s questions rock!” to the analyzer, we’ll get back “bob”, “question”, “rock” – so that’s pretty good.
Things can get a bit wonky with stemming, though. If we analyze “feature category” we’ll get back “featur” and “categori”, which can be a surprise. For cases where the stemming is too aggressive (and it stems two unrelated words to the same base form), you can add entries to the “protwords_en.txt” file to protect them from modification by the stemming algorithm.
Step 4 – Filtering
Often you’ll wind up with terms (words) that are clearly not going to be very useful as text features. But how do you go about identifying significant bad terms and then removing them?
The first thing we often do is calculate a log-likelihood ratio (LLR) score for every term, and sort the results. This lets us eyeball things quickly, tweak settings, and repeat the process. So what’s a log-likelihood ratio? It’s basically a measure of how unlikely it is that some event would have occurred randomly. In our case, it’s how unlikely a given word could have occurred as many times as it did, in emails written by one user, when compared to all words written by all user in all emails. For some additional color commentary check out Ted Dunning’s Surprise and Coincidence blog post.
So the higher the LLR score for a word, the more unlikely it is to have randomly occurred as many times as it did, and this then gives us a useful way to sort words. We use a Cascading SubAssembly from our cascading.utils project called TopTermsByLLR to do most of the work for us.
We can run our workflow on the small set of Mahout emails by executing the TextSimilarityWorkflow.test() method, and then opening up the resulting file in “build/test/TextSimilarityWorkflowTest/test/working/terms/part-00000”. If we check out the top words for the ted.dunning@gmail.com email user, we get an unpleasant surprise – almost all of the top terms are noise:
v3	6.981227896184893
3	6.782776936019315
v2	6.497556317809991
q	6.078475518110127
0.00000	6.055874479673747
wiki	5.959521694776826
result	5.9469144102884295
qr	5.93635582683935
liu	5.353852995656953
v1	5.19438925914239
I say this is a surprise, but in reality almost every time you get initial results back, you’re going to be disappointed. You just have to roll up your sleeves and start improving the signal-to-noise ratio, which usually starts with getting rid of noise.
Looking at these results, we could clean things up pretty quickly by ignoring words that were less than 3 characters long, and skip anything that’s just a number (including ‘.’ and ‘,’ characters). There are a number of places we could do this filtering, but eventually we’ll need to handle it inside of the SolrAnalyzer class when we start generating multi-word terms. The filterWord method is the right modification point, and once we’ve changed it to exclude short words and numbers, our results improve a bit:
result	6.299652144395367
wiki	6.220453017016188
liu	5.553637211267486
mymail	5.050533090688624
as.matrix	4.51710231608846
liuliu.tju	4.501488208584039
decomposit	4.431912003379223
score	4.266076943795874
gmail.com	4.263470592109653
exactli	4.178110810351496
We still get words like “result” that seem pretty generic, and words like “liuliu.tju” that look junky, but we’re probably close enough to start thinking about more sophisticated filtering and actual term scoring.
Stay tuned for part two…
Hi Ken
I like the detail and tips in this! Thanks – hope to step through this myself as I can 🙂
btw, I am new to LLR, and put together a simple tool to explore bigrams online as well
https://googledrive.com/host/0B2GQktu-wcTidC01Ym1lR2h1TTA/
I enjoyed reading this, great job. If you could elaborate more on cascading which would perhaps touch more on the data flow and how the data ends up in solr it would be great. I have seen the nutch/solr integration and it is based on SolrJ but I don’t think that is what you are doing.
Hi Peyman – I might talk about the Solr integration in part 3. As far as Cascading, yes – I should add more details about that.
Hi Brad,
Do you have more details on how you’re calculating LLR scores? E.g. what’s the corpus being used for the total bigram counts?
Thanks,
— Ken
I really like your picture on text extraction and harmonisation.
+1 from me 😉
Looking forward to part 2, Ken!
Hi Ken
Just saw that you had a question when I came to read your second post. The bigrams are from the particular document chosen in the dropdown (most from Project Gutenberg) or from the file chosen from the user’s file system. LLR’s calculated via the method used in mahout (basically straight java–>javascript of Mahout’s implementation).
Hi Brad – for LLR, normally you calculate the score based on k11, k12, k21, and k22 counts, where k11/k12 are term counts for a target document (e.g. one book) and k21/k22 are term counts for all of the other documents (the corpus). So I was assuming there’s a corpus of documents besides the target document.
Ahh – thanks. I had implemented that based on my interpretation of what Dunning had done in his thesis for the Swiss Bank data (and in “Accurate Methods for the Statistics of Surprise and Coincidence”). I didn’t see that he mentioned comparing it to a corpus there, but could have missed it. thanks.